
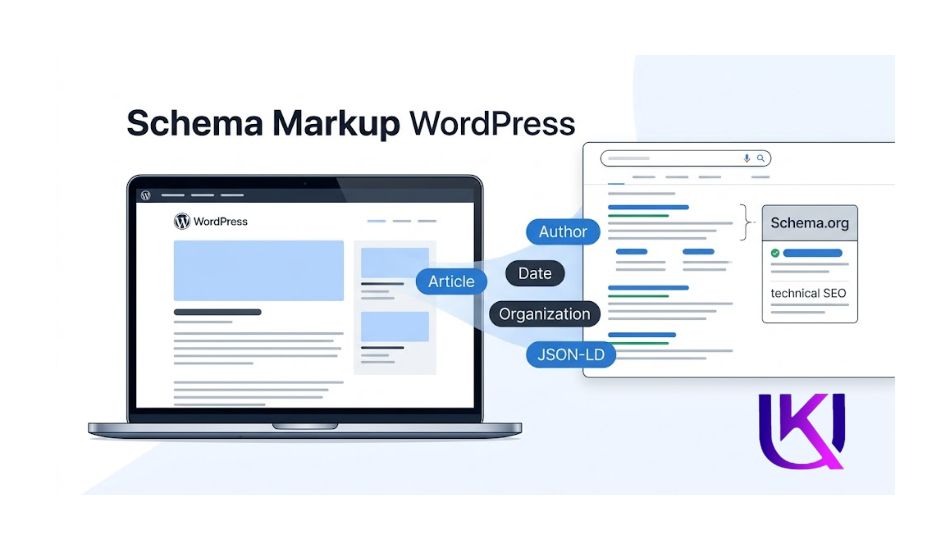
Schema markup WordPress can feel hard when you first see terms like structured data, Schema.org, JSON-LD, and rich results. The real problem is knowing what to add and how to check if it works.
You write a great post. You hit publish. Then you check Google, and your link sits there. Plain. No stars. No FAQ list. No little sitelinks. Just a blue title and two lines of text. But you do not need to be a developer to use it.
Schema markup gives Google Search clearer details about what your page is about, such as an Article, Person, Organization, Product, LocalBusiness, or BreadcrumbList. On a WordPress site, you can add this data with a suitable SEO plugin or by using JSON-LD code.
Meanwhile, the site above you shows a star rating. The one below shows three quick questions right inside the search result. Both get more clicks than you do, even when your content is better.
That gap has a name. It’s called schema markup. It’s a small piece of code that tells Google exactly what your page is about. Add it, and Google can show your page in a bigger, richer, more clickable way.
This guide shows you what schema markup is, why it matters, and how to add it to your WordPress site. Step by step. No coding degree needed.
What Is Schema Markup?
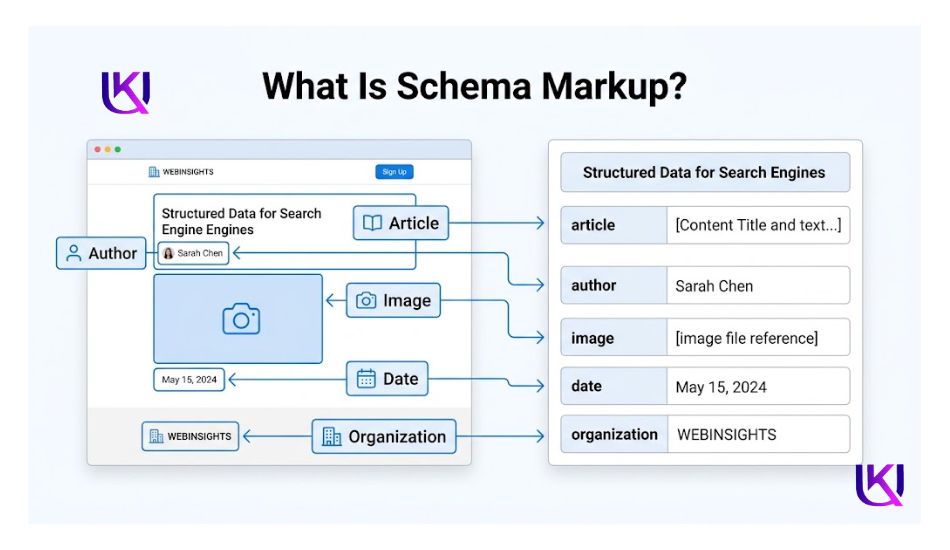
Schema markup is a code snippet you add to your page. It uses a shared vocabulary called schema.org. This vocabulary gives Google clear labels for your content, like “this is a recipe” or “this is a review” or “this is a step-by-step guide.”
Without schema, Google has to guess. Say you publish a page about “jaguar.” Is it the car? The animal? A sports team? Google pulls clues from your words and tries to work it out. Schema removes that guesswork. It tells Google directly, in plain code.
Most modern schema uses a format called JSON-LD. That name stands for JavaScript Object Notation for Linked Data. You don’t need to remember it. In plain terms, it’s a small block of text that sits inside your page’s code. Visitors never see it. Search engines read it.
| Quick Tip: You don’t need to learn code to use schema. WordPress plugins can build it for you in a few clicks. Method 1 below shows you exactly how. |
How Does Schema Markup Work?
Schema markup works by adding extra information to your web page that search engines can read. Your visitors may not notice it, but Google can use it to better understand what your page contains.
Think of it like a label on a box. The box may contain a product, but the label tells you exactly what is inside. Schema markup works in a similar way for your web page.
For example, if you publish a blog post, your JSON-LD data can tell Google:
- This page is an Article.
- This is the article’s headline.
- This person is the author.
- This is the date it was published.
- This image belongs to the article.
- This website publishes the content.
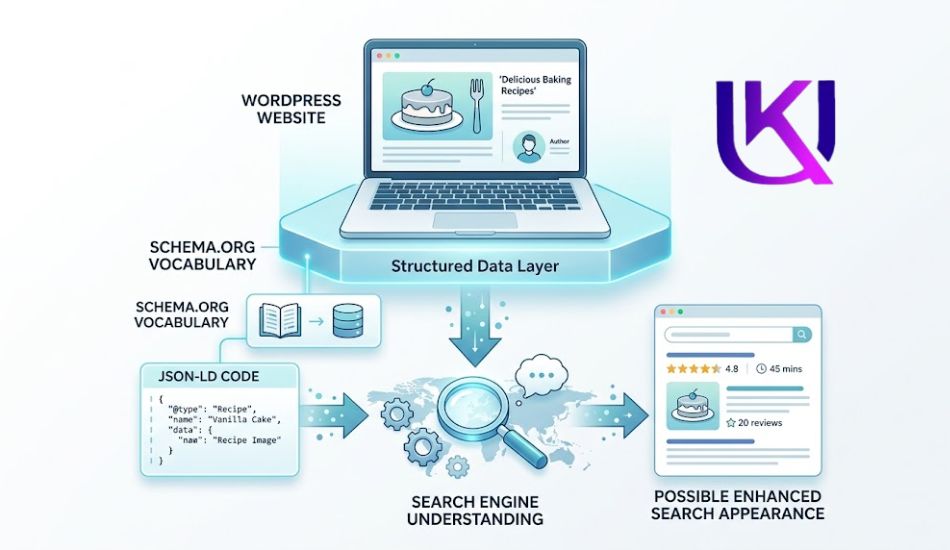
The information follows the Schema.org vocabulary. Google can then read these details along with your normal page content.
What Happens After You Add Schema?
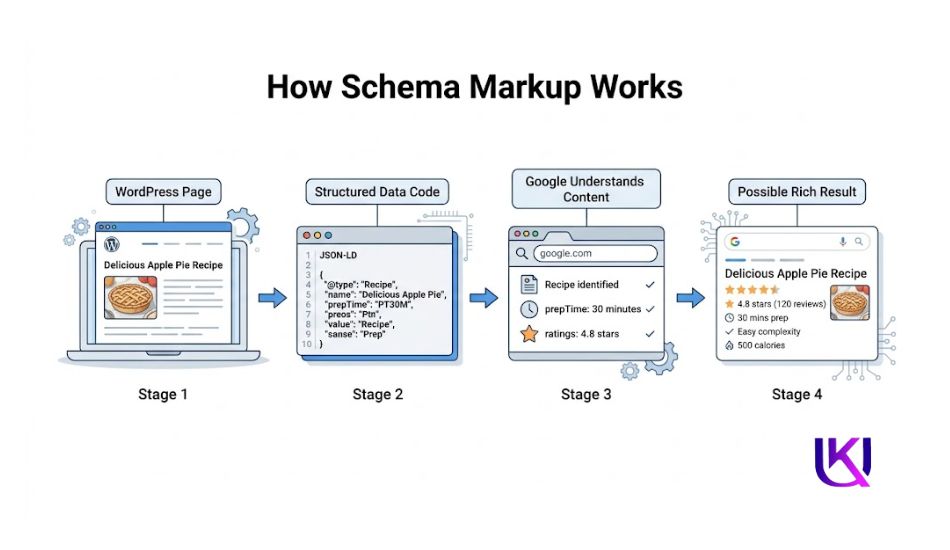
The process is simple:
Your WordPress page → Schema markup → Google reads the data → Google checks the information → Your page may become eligible for a rich result
But there is one important point. Adding schema does not mean Google must show a rich result. Your markup must follow Google’s rules, match the visible page content, and meet the requirements for that search feature.
That is why you should not stop after adding schema. You should also test the markup with the Google Rich Results Test and check your website through Google Search Console.
This simple process helps you catch problems before they become a bigger technical SEO issue.
Why Schema Markup Matters for Your WordPress Site
Schema markup won’t push your page to position one by itself. Google has said this many times. But it does something else that matters just as much. It makes your listing stand out once you’re already ranking.
Here’s what schema can unlock in search results:
- Star ratings under your review posts
- FAQ dropdowns right inside your search result
- Numbered steps for how-to content
- Event dates and locations
- Clean breadcrumb trails instead of a long URL
- Product prices and stock status
Each of these grabs the eye. A plain blue link competes with ten other plain blue links on the same page. A listing with stars and an FAQ dropdown takes up more space and pulls more clicks, even at the same ranking spot.
Schema also helps AI search tools. Systems like Google’s AI Overviews lean on structured data to pull clear, direct answers from your page. Clean schema makes your content easier for these tools to read, quote, and cite.
Why Is Schema Markup Important for WordPress SEO?
When you run a WordPress website, Google has to understand each page before it can decide how that page may appear in Search. Your content already gives Google many clues, but schema markup adds clearer details about what your page means.
This can be useful when your page contains information that fits a supported structured data type.
For example, schema can help describe:
- An Article and its author
- A Product and its details
- A LocalBusiness and its business information
- A Recipe and its recipe details
- A BreadcrumbList that shows your page path
- An Organization or Person connected to your website
1. It Helps Google Understand Your Content
Schema markup gives search engines structured information, rather than relying solely on the visible text on your page.
This can help Google connect important details and understand what your page is about.
2. It Can Support Rich Search Features
Some structured data can make your page eligible for rich results in Google Search.
For example, eligible pages may show extra details in Search when they meet Google’s requirements.
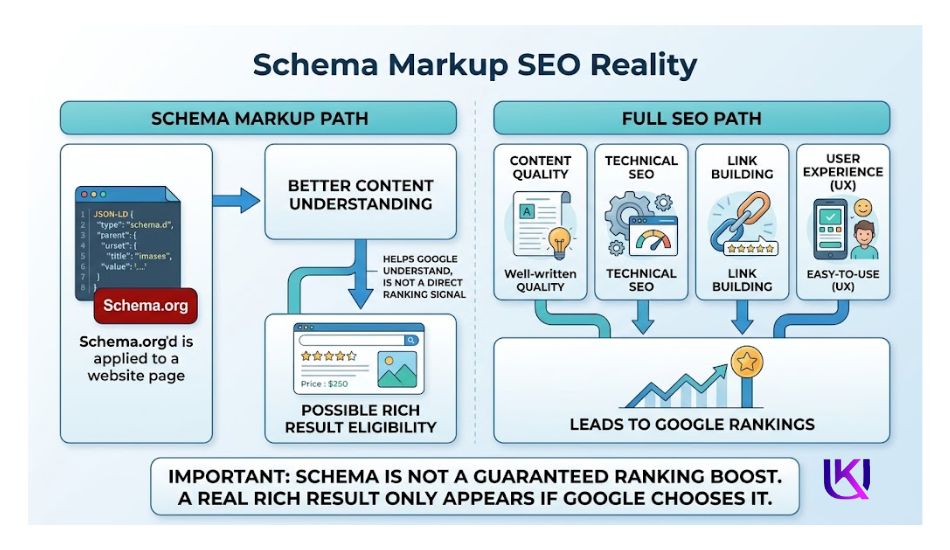
However, schema markup is not a shortcut to higher rankings. Valid markup does not guarantee a rich result, and it does not mean your page will automatically rank higher.
Your content, technical SEO, page experience, links, and many other signals still matter.
3. It Helps You Build Clearer Page Signals
Good schema should match the information users can actually see on your page. If your WordPress site says one thing in the content but your structured data says something else, you create a trust problem.
So, use schema to describe your page accurately. Do not add markup just because you want a search feature.
For you, the goal is simple: give Google clear, accurate information about your WordPress page while keeping the page useful for real people.
The Main Types of Schema You’ll Use
Not every page needs the same schema. Match the type to the content on the page.
| Schema Type | Best For | What It Adds to Search Results |
| Article | Blog posts, news, guides | Author name, publish date, headline image |
| FAQPage | Pages with Q&A sections | Expandable question list in results |
| HowTo | Step-by-step tutorials | Numbered steps, sometimes with images |
| Product | Online stores, WooCommerce | Price, stock status, star rating |
| Review | Product or service reviews | Star rating under the listing |
| LocalBusiness | Business homepage, contact page | Address, hours, phone number |
| BreadcrumbList | Any page with a URL path | Clean breadcrumb trail in results |
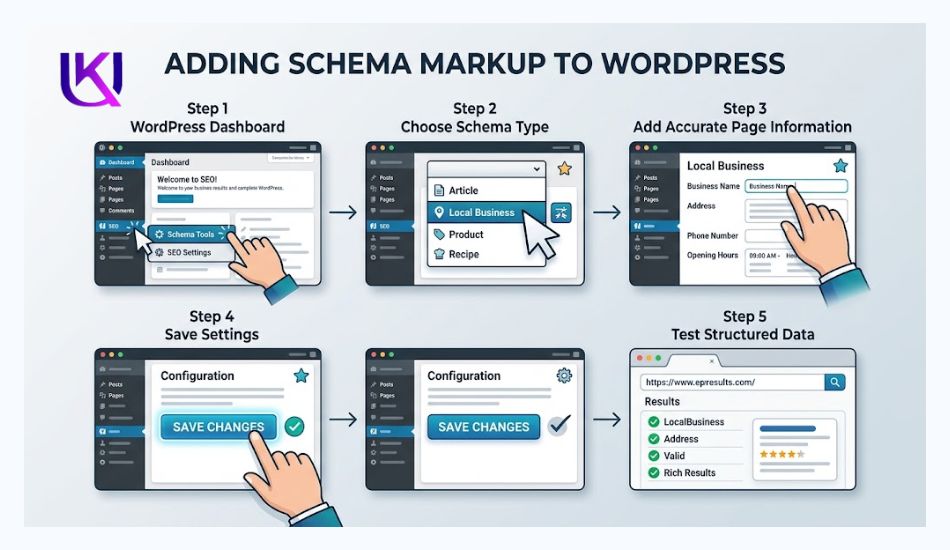
How to Add Schema Markup to WordPress
You can add schema markup to WordPress without writing complex code. In most cases, you have two practical choices: use a WordPress SEO or schema plugin, or add JSON-LD manually.
Before you add anything, check whether your website already has schema. Many WordPress SEO plugins and themes can create structured data automatically. Adding another system without checking first can create duplicate or conflicting markup.
You have three ways to do this. Pick the one that fits your comfort level.
Method 1: Use a WordPress SEO Plugin
A plugin is often the easiest option if you are new to schema markup.
Popular WordPress SEO plugins such as Yoast SEO and Rank Math can generate structured data for supported content.
Your exact settings may differ, but the process usually looks like this:
- Install and activate your chosen SEO plugin.
- Open the plugin’s schema or structured data settings.
- Choose the schema type that matches your page.
- Add accurate information about the page.
- Save your changes.
- Open the live page and test the structured data.
For a normal blog post, the plugin may already create Article or BlogPosting schema. Your job is to check that the information is correct.
Do not add a second Article schema just because you think more schema will help. If your plugin already creates it, adding another version can cause unnecessary duplication.
Use Rank Math (Easiest Option)
Rank Math is a free WordPress SEO plugin. It builds schema for you. No code needed.
1. Install and activate Rank Math from your WordPress dashboard, under Plugins, then Add New.
2. Run the setup wizard. Rank Math turns on its Schema module by default.
3. Open any post or page you want to mark up.
4. Scroll to the Rank Math box below the editor. Click the Schema tab.
5. Pick a schema type from the list, such as Article, FAQ, HowTo, or Product.
6. Fill in the fields Rank Math asks for, like author name or step details.
7. Click Update or Publish. Your schema is now live on that page.
You can also set a default schema type for each post category. Go to Rank Math, then Titles & Meta, to change that setting site-wide.
Method 2: Use a Dedicated Schema Plugin
If you don’t use Rank Math, a standalone plugin works too. Schema Pro and WP Schema Pro are popular picks. The steps look similar:
1. Install a schema-focused plugin from the WordPress plugin directory.
2. Choose a schema type for your page, or set a site-wide default.
3. Fill in the required fields.
4. Save your changes.
| Watch Out For This: Don’t run two schema plugins at once. Both can output JSON-LD for the same page, and that creates duplicate or conflicting code. Pick one plugin and stick with it. |
Method 3: Add JSON-LD Code by Hand
If you like more control, you can paste JSON-LD code straight into your page.
1. Write your JSON-LD code, or generate it with a free schema generator tool.
2. Install a code plugin like WPCode, or open your theme’s header file.
3. Paste the code inside a script tag, placed in the page header.
4. Save and publish the page.
5. Test the code before you trust it. The next section shows you how.
This method takes more care. One missing comma can break the whole block. Most site owners find Method 1 or Method 2 faster and safer.
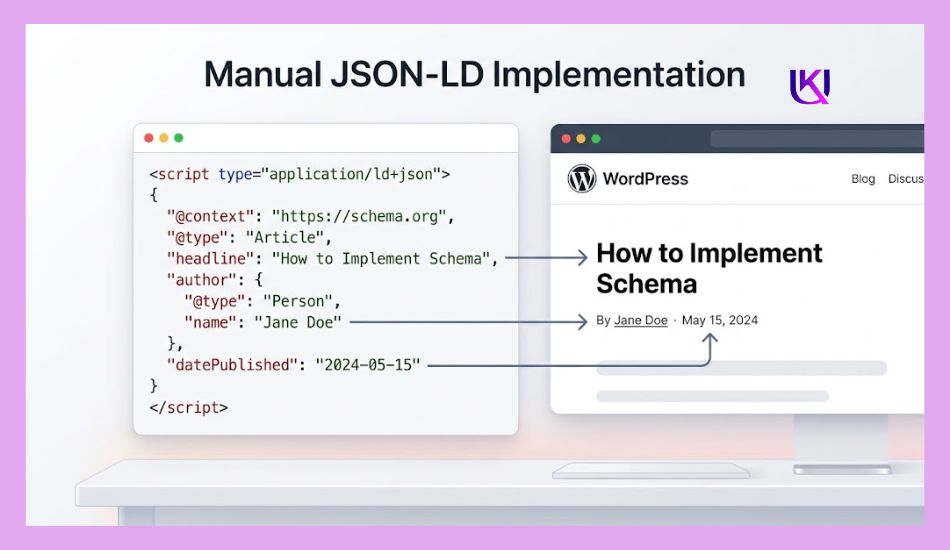
Add JSON-LD Manually
You can also add JSON-LD yourself when you need more control.
A basic Article example looks like this:
{
“@context”: “https://schema.org”,
“@type”: “Article”,
“headline”: “Your Article Title”,
“author”: {
“@type”: “Person”,
“name”: “Your Name”
},
“datePublished”: “2026-08-17”
}
This code tells search engines that the page is an Article and provides basic information about its headline, author, and publication date.
You should replace the example information with details that are true for your page. Do not copy the code and leave fake or incorrect values in it.
Which Method Is Better?
If you are a beginner, a trusted WordPress SEO plugin can make schema easier to manage.
Manual JSON-LD can be useful when you need more control or have a specific technical SEO setup.
Whichever method you choose, always check the final markup. Adding schema is only the first step. Testing it is what helps you find mistakes before you rely on it.
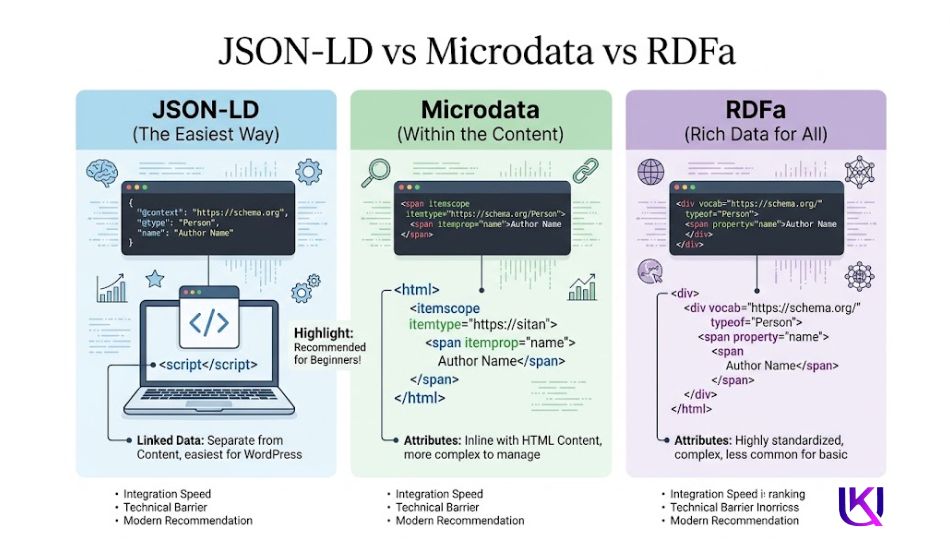
JSON-LD vs Microdata vs RDFa
When you start learning about schema markup, you may see three formats: JSON-LD, Microdata, and RDFa.
All three can add structured data to a web page. But for most WordPress websites, JSON-LD is the easiest option to manage.
JSON-LD
- JSON-LD adds structured data in a script on your page.
- You do not need to place schema code around every piece of visible text. This makes JSON-LD easier to add, update, and manage.
- For example, your Article schema can describe the page title, author, image, and publication date without changing how the article looks to your visitors.
- Google recommends JSON-LD in most cases because it is easier to implement and maintain.
Microdata
- Microdata adds structured data directly to your HTML elements.
- For example, you may add schema properties to the HTML that contains your article title, author, or other page information.
- This can work, but managing it can become harder when your page has many elements or when you change your WordPress theme.
RDFa
- RDFa is another way to add structured information to HTML.
- It can describe relationships between different pieces of information on a page.
- However, it is less common for a beginner WordPress setup.
Which One Should You Use?
For most WordPress users, JSON-LD is the practical choice.
It keeps your structured data separate from the visible page content and is easier to maintain. You can also use a WordPress SEO or schema plugin that creates JSON-LD for you.
The important part is not simply choosing a format. Your structured data must still be accurate, relevant, and consistent with the content users can see on your page.
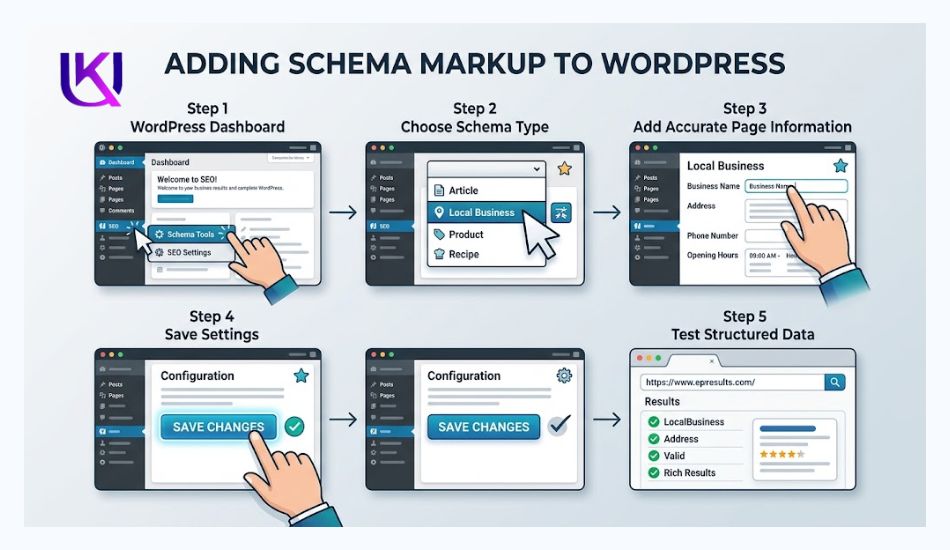
How to Add Schema Markup With a WordPress SEO Plugin
If you are new to schema markup in WordPress, using an SEO plugin can be the simplest way to get started. You do not need to edit your theme files or write JSON-LD by hand.
Before you begin, check whether your current plugin already creates schema. If it does, you may only need to review its settings instead of adding another schema tool.
Step 1: Choose a Schema-Supporting SEO Plugin
You can use a WordPress SEO plugin that supports structured data, such as Yoast SEO or Rank Math.
Install only the tool you need. Using several plugins that create the same schema can lead to duplicate markup.
Step 2: Set the Correct Page Type
Open the schema settings for the page or post you want to optimize.
For a normal blog post, Article or BlogPosting may be suitable.
For other pages, the correct type may be different. A product page may need Product schema, while a business page may use Organization or an appropriate LocalBusiness type.
Choose the type that matches the actual page.
Step 3: Check the Page Information
Look at the information your plugin adds to the structured data.
Check details such as:
- Page title
- Author name
- Main image
- Publication date
- Updated date
- Website name
- Organization details
Make sure these details are true and match the visible content on your page.
Step 4: Save and Publish Your Changes
After checking the settings, save your changes and open the live page.
Do not assume the schema is correct just because the plugin says it has added it. Your next step is to test the live page.
Step 5: Test Your Schema
Use Google’s Rich Results Test to check whether Google can read the structured data on your page.
If the test reports an error, fix it before moving on. If the markup is valid, you can then use Google Search Console to monitor the page after Google crawls it.
The plugin makes adding schema easier, but it does not remove your responsibility to check the result. You still need to make sure the markup is accurate, matches your content, and follows Google’s structured data guidelines.
How to Check If Your Schema Actually Works
Adding schema isn’t the finish line. Google needs to read it correctly too.
- Go to Google’s Rich Results Test at search.google.com/test/rich-results.
- Paste your page URL, or paste the raw code instead.
- Click Test URL.
- Look for green checkmarks. These mean your page is eligible for rich results.
- Fix any errors or warnings listed below your results.
Run this test after every schema change. A small edit to your page can quietly break your markup, and you won’t notice unless you check.
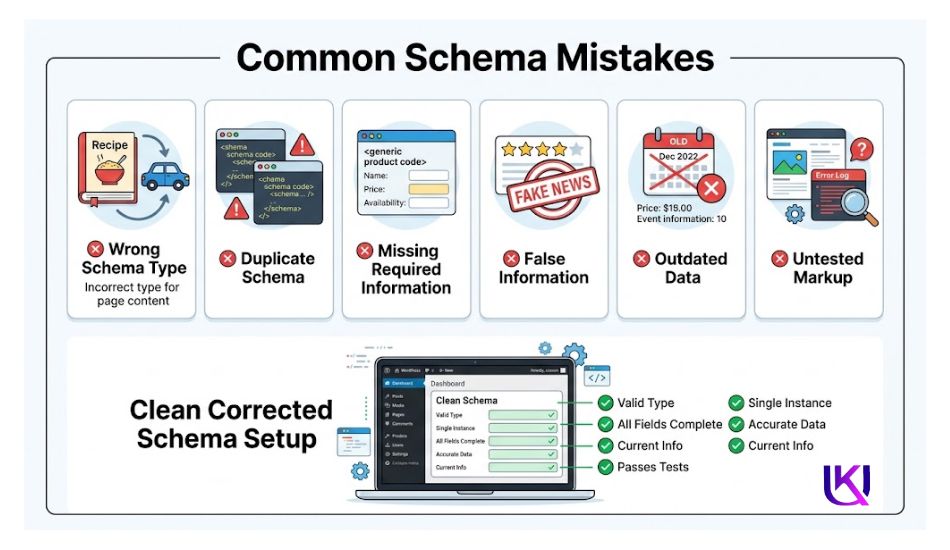
Common Schema Mistakes to Avoid
Marking up content that isn’t on the page. If your schema claims a 4.8-star rating but your page shows a different rating, Google can flag it.
- Running duplicate schema plugins, as mentioned above.
- Using the wrong schema type. A recipe page needs Recipe schema, not just Article schema.
- Forgetting to update schema after you edit a page. If your price changes but your schema doesn’t, that mismatch can get flagged.
- Skipping the test step. Never assume your schema is correct just because you filled in the fields.
How to Choose the Right Schema Markup for Your WordPress Page
Choosing the right schema type is easier when you start with one simple question:
What is this page actually about?
Do not choose schema based only on the rich result you want. Your markup should describe the real content on the page.
Match the Schema to Your Content
For example, if you publish a normal blog article, Article or BlogPosting may be a good fit.
If you sell a physical product, Product schema may be more suitable.
If you run a local business, an appropriate LocalBusiness type can describe your business details.
You may also use Person, Organization, or BreadcrumbList when they correctly describe information on your site.
Use Only Relevant Information
Your schema should contain information that is accurate and supported by your page.
For example, if your article shows one author, your structured data should not name a different person.
The same applies to:
- Article title
- Author
- Images
- Dates
- Product details
- Business information
- Reviews
- Prices
- Availability
Keep your structured data and visible content in agreement.
Do Not Add Schema Just for SEO
More schema does not automatically mean better SEO (Search Engine Optimization).
You may see many schema types available and feel tempted to add several of them to one page. Avoid this unless each type has a real purpose.
For example, adding Product schema to a page that does not sell or describe a product does not make the page more useful.
Your goal is to give search engines clear and accurate information, not to fill your page with as much schema as possible.
Check Google’s Requirements
Different structured data features have different requirements.
Before you add a schema type, check Google’s current documentation for that feature. Some properties may be required, while others are recommended.
Also remember that valid schema does not guarantee a rich result in Google Search.
The safest approach is simple:
Understand the page → Choose the matching schema → Add accurate information → Test it → Monitor the result.
Test Before You Rely on It
Use the Google Rich Results Test after adding or changing schema.
For broader Schema.org validation, you can also use the Schema Markup Validator.
Testing helps you find errors that may not be obvious when you are looking at the normal page.
Keep Schema Updated
Schema is not something you add once and forget.
When you change an article title, author, image, product price, business details, or another important part of a page, check whether the structured data needs an update too.
Follow Google’s Guidelines
Google’s structured data rules can differ by feature and can change over time.
Before using a schema type for a specific search feature, check Google’s current documentation.
Most importantly, never add misleading information simply to qualify for a rich result.
Focus on People First
Your visitors should always come first.
Write useful content, make your pages easy to use, and then use schema to describe that content clearly.
That approach gives your WordPress site a stronger technical SEO foundation than trying to use schema as a shortcut.
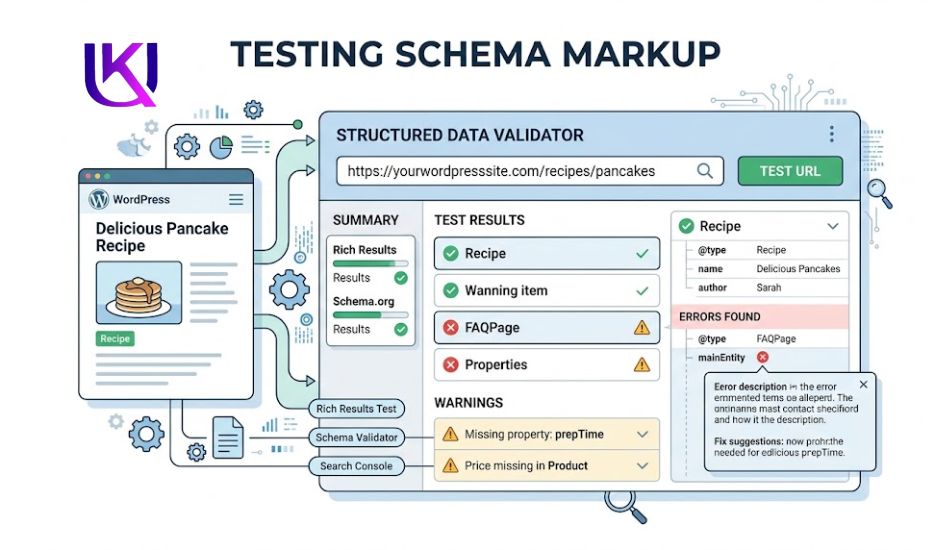
How to Test Schema Markup on WordPress
Adding schema markup is not the final step. You should test your structured data to make sure Google can read it and that you have not made a simple mistake.
You can do this with two useful tools: Google’s Rich Results Test and the Schema Markup Validator.
Use Google’s Rich Results Test
The Rich Results Test helps you check whether your page’s structured data can make it eligible for supported Google rich results.
To test your WordPress page:
- Open the Rich Results Test.
- Enter your live page URL.
- Start the test.
- Review the structured data Google detects.
- Check for errors or warnings.
- Fix important issues.
- Run the test again.
You can also test your code before adding it to your live WordPress page.
Use the Schema Markup Validator
The Schema Markup Validator checks structured data based on the broader Schema.org vocabulary.
This is useful when you want to check whether your markup is structured correctly, even when you are not testing a specific Google rich-result feature.
Think of the tools this way:
Rich Results Test → Google Search eligibility
Schema Markup Validator → Schema.org markup validation
Using both can give you a better view of your implementation.
Check the Page in Google Search Console
After you publish your schema, you can use Google Search Console to inspect the URL and see how Google processes the page.
Open the URL Inspection tool and enter your page URL. This can help you check whether Google can access the page and whether it has been indexed.
Keep in mind that testing tools and Search Console serve different purposes. A page can have valid schema and still not show a rich result.
Fix Errors Before You Move On
If you find an error, do not ignore it.
Check the schema type, required properties, URLs, dates, names, images, and other information connected to the markup.
Then test the page again.
The goal is not simply to get a green result. Your schema should accurately describe the page and follow Google’s structured data guidelines.
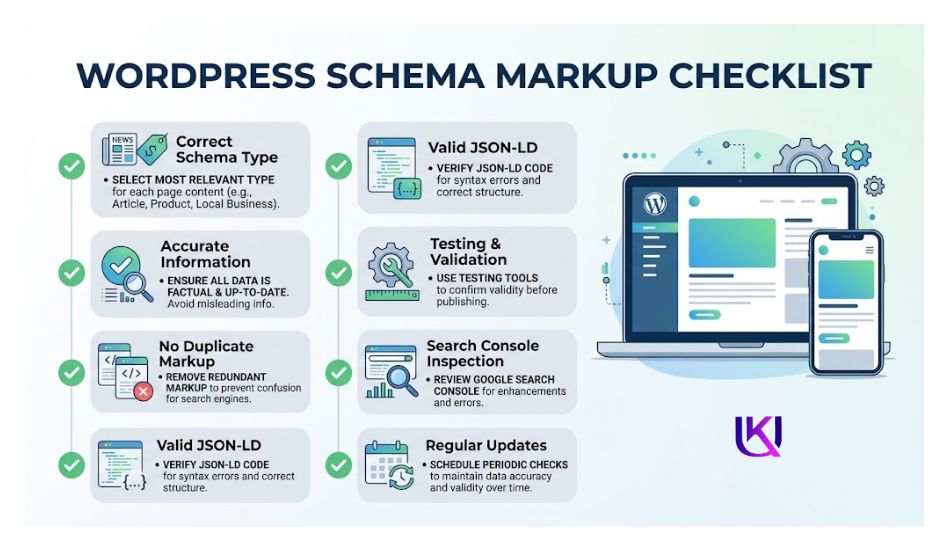
Schema Markup WordPress Checklist
Before you finish your schema setup, use this quick checklist. It can help you catch common problems before Google processes your page.
- Your schema type matches the actual page content.
- Your JSON-LD or other structured data contains accurate information.
- Your author, title, image, and dates match the visible page.
- You have checked whether your WordPress theme already generates schema markup.
- You are not creating duplicate schema with multiple plugins.
- Required properties are included for the schema type you use.
- You tested the page with Google’s Rich Results Test.
- You checked the markup with the Schema Markup Validator when needed.
- You inspected the page in Google Search Console (GSC) after publishing.
- You understand that valid schema does not guarantee a rich result.
- You do not use false, hidden, or misleading information.
- You review your schema when important page information changes.
If you can check these points, your WordPress schema markup has a much better foundation.
The next step is not to add more schema. It is to ensure the schema you already use remains accurate, relevant, and useful.
Conclusion: What Is Schema Markup in WordPress and Do You Really Need It?
Getting your schema set up right sounds like a simple key point: schema markup helps Google understand what your page represents.
Once it’s laid out step by step. But small mistakes, like a missing field, a duplicate plugin, or an outdated price, can quietly cost you rich results for months.
It does not replace good content, technical SEO, or useful information. It also does not guarantee a higher Google ranking. Instead, correct structured data can make your page eligible for certain enhanced search appearances, depending on the schema type and Google’s requirements.
So, if you run a WordPress website, think of schema markup as extra information that helps search engines read your page more clearly.
Helpful relevant article: Google Search Console for Beginners: Your First 7 Days
FAQs About Schema Markup WordPress
1. What is schema markup in WordPress?
Schema markup is structured data that helps search engines understand what your WordPress page represents. You can add it through an SEO or schema plugin, or by using JSON-LD manually.
2. Is schema markup important for SEO?
Yes, it can be useful for technical SEO because it gives search engines structured information about your content. However, schema markup is not a direct ranking boost and does not guarantee a rich result.
3. Can you add schema markup to WordPress without coding?
Yes. Many WordPress SEO plugins can create structured data for you. This can be easier than adding JSON-LD manually, especially if you are new to technical SEO.
4. Is JSON-LD better than Microdata?
For most WordPress sites, JSON-LD is the easier option to manage. Google also recommends JSON-LD in most cases because it is generally easier to implement and maintain.
5. Which schema should you use for a blog post?
Article or BlogPosting may be suitable for a normal blog post. The correct choice depends on what your page contains and which schema type accurately describes it.
6. How do you test WordPress schema markup?
You can use Google’s Rich Results Test to check whether your structured data can support eligible Google rich results. You can also use the Schema Markup Validator to check your Schema.org markup.
7. Why is my schema not showing in Google?
Valid schema does not guarantee that Google will show a rich result. Google decides when eligible search features appear. Your page also needs to meet the requirements for the specific feature.
8. Does schema markup improve Google rankings?
Not directly. Schema can help Google understand your page and may make it eligible for certain enhanced search appearances, but it does not guarantee higher rankings.
9. Should you add schema with more than one WordPress plugin?
Usually, you should avoid creating duplicate schema. First check what your existing theme and plugins already generate. Adding another tool can create overlapping structured data that makes your setup harder to manage.
10. How often should you check your schema?
Check it when you make major changes to your website, such as changing your theme, SEO plugin, author information, product details, or important page content. Regular checks can also help you catch new errors early.